How to Remove Tail Lights from a 1992 corvette remover tail lights for led load resistor
The 1992 Chevrolet Corvette is an icon in the automotive world. Known for its sleek design and cutting-edge features for its time, it turns heads to this day at car meets and on the road. One of its standout features? Those uniquely styled tail lights that scream classic American sports car 1992 corvette remover tail lights for led load resistor.
If you’re a Corvette enthusiast, you may already know that upgrading the traditional tail lights to LEDs continues to be popular among car owners. However, making the leap to LED tail lights comes with one essential element you can’t ignore—properly integrating load resistors. This ensures the lights function seamlessly without hyper-flashing or other electrical mishaps 1992 corvette remover tail lights for led load resistor.
This guide will not only walk you through the process of removing the tail lights from your 1992 Corvette but also explain how to wire load resistors to enjoy all the benefits of LED lights. Whether you’re a seasoned car enthusiast or tackling your first upgrade, by the end of this post, you’ll feel ready to enhance your ride.
From Tradition to Innovation: A Spotlight on LED Tail Lights
Switching from traditional incandescent bulbs to LED tail lights is a no-brainer for modern car enthusiasts. Here’s why more people are making the change:
- Brightness: LEDs are significantly brighter than traditional bulbs, improving visibility and safety.
- Energy Efficiency: LEDs consume far less energy, putting less strain on your car battery.
- Longevity: With a longer lifespan, you’ll enjoy years of uninterrupted performance.
- Stylish Aesthetics: An upgrade to LEDs gives your 1992 Corvette a sleek, contemporary look while still honoring its classic design.
However, the main challenge with upgrading to LED lights lies in their compatibility with older electrical systems. This is where load resistors play a critical role.
Why Are Load Resistors Crucial for LED Tail Lights?
Installing LED tail lights in a vehicle designed for traditional bulbs often leads to a phenomenon known as hyper-flashing, where the turn signal flashes at an abnormally fast rate. This happens because LEDs draw significantly less current than incandescent bulbs, tricking your Corvette’s system into thinking there’s an issue, like a burnt-out bulb.
The fix? Installing load resistors. These small components “trick” your car’s electrical system by imitating the current draw of traditional bulbs, restoring normal functionality. Properly integrating load resistors ensures your LED tail lights not only look great but also function as they should.
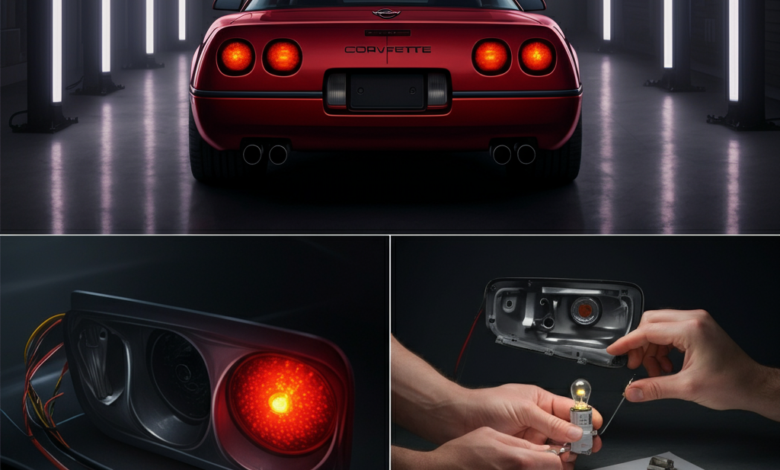
A Step-by-Step Guide to Removing 1992 Corvette Tail Lights
Before you can install LED lights and load resistors, you need to remove the factory tail lights from your 1992 Corvette. Follow these steps carefully to avoid any damage.
Tools You’ll Need
- Flathead screwdriver
- Phillips head screwdriver
- Socket wrench set
- Pair of gloves
Instructions
- Locate the Tail Light Assembly
Open the rear hatch of your Corvette and locate the access panels behind the tail lights. These panels are your starting point for removal.
- Remove the Access Panel
Use a flathead screwdriver to carefully pry open the access panel. Set the panel aside for reinstallation.
- Disconnect the Electrical Harness
Locate the electrical harness connected to the back of the tail light. Gently unplug it by pressing on the release clip and pulling it apart.
- Unscrew the Tail Light Housing
Using a socket wrench or Phillips head screwdriver, unscrew the bolts holding the tail light assembly in place. Be sure to keep the screws in a safe place for reinstallation later.
- Pull Out the Tail Light Assembly
Carefully wiggle out the tail light housing. Take your time to prevent any scratches or damage to the bodywork.
With your tail lights now removed, you’re ready to move on to the installation process for LED tail lights and load resistors.
Installing LED Tail Lights with Load Resistors in a 1992 Corvette
Now that the tail light housing is removed, follow these steps to install your LED lights and integrate load resistors.
Tools & Materials Needed
- New LED tail light bulbs
- Load resistors (one per LED bulb)
- Wire connectors or soldering kit
- Electrical tape
- Zip ties
- Heat shrink tubing
Instructions
- Install the LED Tail Lights
- Insert the LED bulbs into the tail light housing just like you would with traditional bulbs.
- Secure the bulbs firmly to ensure proper contact with the electrical harness.
- Wire the Load Resistors
- Identify the turn signal wires on the electrical harness. Consult your Corvette’s wiring diagram if you’re unsure.
- Using wire connectors or a soldering kit, splice the load resistor into the turn signal circuit.
-
- One end of the load resistor should connect to the positive wire of the turn signal.
- The other end should connect to the ground wire.
- Secure the Load Resistor
Load resistors can get warm during use, so make sure to mount them away from any plastic components or wiring. Use zip ties to secure them to a metal surface inside the tail light assembly area.
- Test the Lights
Reconnect the electrical harness to the tail light assembly and test the LED lights and turn signals for proper functionality. Ensure there’s no hyper-flashing or error messages on your dashboard.
- Reassemble the Tail Light Housing
Screw the tail light assembly back into its place, reconnect the electrical harness, and reattach the access panel.
- Final Check
Test all the tail lights once again to confirm everything works perfectly.
Tips for Maintaining Your 1992 Corvette’s LED Tail Lights
- Routine Inspections: Check your tail lights regularly for any signs of dimming or malfunction.
- Keep It Clean: Dirty tail lights can reduce visibility. Wipe them clean during your regular car wash routine.
- Troubleshooting: If you experience hyper-flashing after installation, double-check your load resistor connections. Faulty connections are often the culprit.
LED Tail Lights for Your 1992 Corvette: A Worthwhile Upgrade
Switching to LED tail lights is one of the easiest ways to modernize your classic Corvette. Not only do they enhance the look of your car, but they also improve visibility and safety on the road. By following this guide, you can confidently tackle the process of upgrading your lights and installing load resistors to ensure proper function.
Have questions about upgrading your 1992 Corvette? Or maybe you’ve already tackled your own LED project? Share your thoughts in the comments below—we’d love to hear from you!